Adding locations with a right-click in Windows File Explorer
Before we move onto importing your legacy emails, we will cover how you can create new locations. CloudFiler has a range of methods including:
- Via the Portal, which is how you created the TESTING location

- Via the right-click menu in Windows File Explorer, which is what we will do next
- Via our programming interface (API)
- Via our Location Manager
- Via our Bulk Uploader or Bulk Importer
- Via the right-click option on the Hub icon
- Via an automated Discovery task (in development)
Adding locations via the Windows File Explorer – right click
This is a fast changing area in CloudFiler, so at the time of writing this feature is only available to those who are Admins. If you want others to be able to add locations this way, contact us as there are options.
We are going to add a Location that will sync its emails to a Windows File System folder. If you need to file into SharePoint, get it to sync the folder to your PC and then follow the steps using the folder on your local machine which is a OneDrive link to the folder in SharePoint.
In most cases you will have a structure similar to this, where there is a top-level projects folder, a sub-folder for each year, a folder for each project and then a subfolder of the project to contain the emails:
P:\Projects
\2024
\2025
\2026
\260014 Broadway Mansions
\260015 Fairview Towers
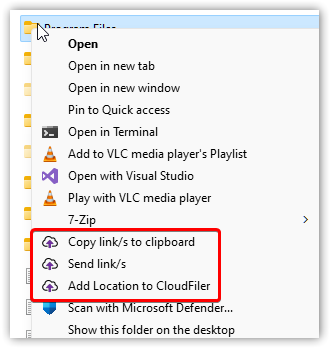
- In Windows File Explorer, navigate down into a project folder and then Right-click the email subfolder
- By default, Windows no longer displays the full menu of options, so pick Show more options at the bottom of the list
- You can get Windows to always show the full list as detailed here: Show the full right-click menu
- Pick Add Location to CloudFiler
- Note that the Add Location App has assumed that the name of the location should be name of the folder immediately above it. In our example it would be 260015 Fairview Towers
- It’s a combo box which contains all the elements of the path – try clicking the down-arrow on the right
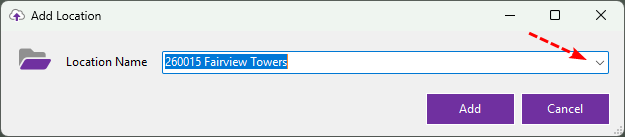
- You will see that you can pick another part of the path if that makes sense in your business and you can edit the location name too
- Once you are happy that the name is correct, pick Add
The location has been added to CloudFiler and by default will immediately be accessible to all staff – we cover controlling access rights later.
- Pop back into Outlook
- Hit the refresh icon at the foot of the CloudFiler Add-in
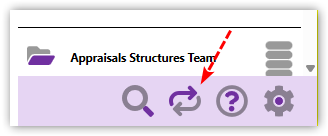
- You should now find that your new location is in the list
- Try filing some emails to this location too
Next step: Securing confidential locations